
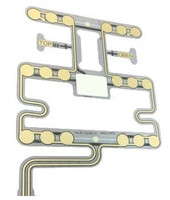
Need to replace your seat in a Freightliner Cascadia - you must read this!!
Replacing the Seat Occupancy Sensor in Your Freightliner Cascadia: A Complete Guide
If you've ever had a phantom seatbelt chime that won't quit, a Detroit Assurance fault code that won't clear, or a dash warning that insists your seat is empty while you're sitting right in it, the culprit is very likely a failing Seat Occupancy Sensor (SOS). It's a small, easy-to-overlook component — but on a modern Freightliner Cascadia, it plays a much bigger role in your safety than most drivers realize.
At Seat Specialists, we get calls about this part constantly, so we put together this guide to walk you through what the SOS actually does, how to tell when it's failing, and how to replace it. The process is nearly identical whether your Cascadia is fitted with a National, ISRI, or Sears seat, so this guide covers the general steps that apply across all three makes. We are also working with Knoedler Manufacturers to make an option for their customers as well. There is a community dedicated to the Knoedler Air Chief, so we are pushing to get an option for you all as well.
What Does the Seat Occupancy Sensor Actually Do?
The SOS is a thin, pressure-sensitive pad built into the seat cushion, wired into the truck's electrical system at the seat base. Its job is simple in concept but critical in practice: it tells the truck's computer whether a person is actually sitting in the seat.
That single piece of information feeds several safety-critical systems, including:
- Seatbelt reminder chimes and dash alerts — so the truck knows to warn an occupied but unbuckled driver, without nagging an empty seat.
- Detroit Assurance safety systems — occupancy status is monitored directly on the Detroit Assurance panel and can affect how driver-assist features behave.
- Fault code monitoring — a bad sensor throws codes that a technician can pull with DiagnosticLink, and it can trigger dash warnings that stay lit until the sensor is replaced.
In short, a failed SOS isn't just an annoyance — it's a broken link in the safety chain between the driver and the truck's monitoring systems. That's why we consider it a must-have replacement part, not an optional one, for any fleet that takes driver safety seriously.
Signs Your Seat Occupancy Sensor Needs Replacing
Before you pull the seat cushion apart, watch for these common warning signs:
- A seatbelt chime or icon that stays on (or off) regardless of whether the seat is occupied
- Fault codes tied to the SOS component (VMRS component code 002-057-053) showing up in DiagnosticLink
- The Detroit Assurance panel reporting "Not Occupied" status while the driver is seated
- Inconsistent readings after seat adjustments, spills, or visible wear/cracking in the cushion foam
If any of these sound familiar, it's time for a replacement — and it's a job most fleet techs can knock out in under an hour with the right part in hand.
Tools and Parts You'll Need
- A replacement Seat Occupancy Sensor available at Seat Specialists
- A trim tool or flathead for removing fasteners and hog rings (if applicable)
- Pliers (for hog-ring style cushion covers)
- Zip ties for harness routing
- A laptop with DiagnosticLink and an RP1210B-compliant vehicle diagnostic adaptor for post-install verification
Step-by-Step: General SOS Replacement Process
While the exact attachment method varies slightly by seat manufacturer (adhesive tape, felt tape, or Velcro), the overall replacement sequence is the same across seat makes.
1. Remove the Seat Cushion Cover
Detach the cushion cover from the seat cushion to expose the old sensor. Depending on your seat make, this means untying the upholstery draw string, unpicking hog rings with pliers, or pulling the cover free from its Velcro strips.
2. Remove the Old Sensor and Position the New One
Set the new sensor onto the seat cushion (or heater element, if equipped) in the same location and orientation as the original. Some sensors key into place using locating tabs and holes; others rely on an adhesive or felt tape backing. Press firmly to ensure full, even contact with the cushion — a poorly seated sensor will give inconsistent occupancy readings even when it's brand new.
3. Reinstall the Cushion Cover
Pull the cover back over the cushion and secure it using whatever method your seat uses — tying the draw string, pinching new hog rings into place with pliers, or pressing the material firmly onto the Velcro strips. The cover needs to sit snug and even, with no bunching over the sensor pad.
4. Reinstall the Cushion Onto the Seat Base
Set the cushion assembly back onto the seat base and secure it with its fasteners or retainer slides. Make sure the cushion locks into its front and rear retainers correctly before moving on — a cushion that isn't fully seated can put uneven pressure on the sensor.
5. Connect the Sensor Harness
Connect the SOS connector at the seat base. If your seat is equipped with a pneumatic lumbar or air-adjust feature, reconnect the airline at the valve connection as well. Route the harness along the seat's air hose and away from any hard structure, moving parts, or pinch points, and secure it with tie straps as needed.
6. Check the Harness Through Full Range of Motion
This step gets skipped more than any other — and it's the one most likely to cause a comeback. With the harness connected, cycle the seat through its full range: fully raised with the cushion forwarded, and fully lowered with the cushion rearward. Confirm the harness has slack to move freely and doesn't kink, stretch, or pinch anywhere in the travel range.
7. Verify Sensor Function With Diagnostics
Once everything is reassembled, confirm the new sensor is working correctly before putting the truck back in service:
- Connect an RP1210B-compliant vehicle diagnostic adaptor to the diagnostic connector and your laptop.
- Turn the ignition switch ON and open DiagnosticLink, confirming all ECUs are online.
- Open the Detroit Assurance panel and verify the SOS is reporting and free of fault codes.
- Sit on the seat and confirm the system registers the seat as occupied.
- Stand up with no weight on the seat and confirm the reading switches back to "Not Occupied."
If the readings track correctly through both states and no fault codes are present, the job's done.
Don't Wait on a Failing Sensor
A malfunctioning seat occupancy sensor might seem like a minor annoyance, but it directly affects how your truck communicates seatbelt status and occupancy to its safety systems. For owner-operators and fleets alike, keeping this sensor in good working order is a small investment that protects driver safety and keeps your trucks free of nagging fault codes.
Seat Specialists carries Seat Occupancy Sensors for National, ISRI, and Sears seats used in Freightliner Cascadia trucks, so you can get the exact part your seat needs and get back on the road with confidence. Browse our SOS inventory today, or reach out to our team if you're not sure which sensor matches your seat — we're happy to help you get it right the first time.
Recent Posts
-

Big Rig Seats Auction: Semi Truck Seat Auctions on Facebook | Seat Specialists
Introducing Big Rig Seats Auction: Bid on Class 8 Truck Seats Starting October 12 Seat Specialists i …Oct 2nd 2026 -

Flash Sale Alert: Save Up to 22% on In-Stock Truck Seats
Great seats don't sit on the shelf for long — and right now, Seat Specialists is running a flash sal …Sep 15th 2026 -
Tired of Looking at a Worn-Out Driver's Seat? EZ-Fit Fixes That in Minutes
Seat Specialists Blog New Arrival Tired of Looking at a Worn-Out Driver's Seat? EZ-Fit Fixes That i …Aug 28th 2026